Hot Reads

Kamis, 21 Februari 2013

Clove Hitch tying using Half Hitches


Clove Hitch tying using Half Hitches

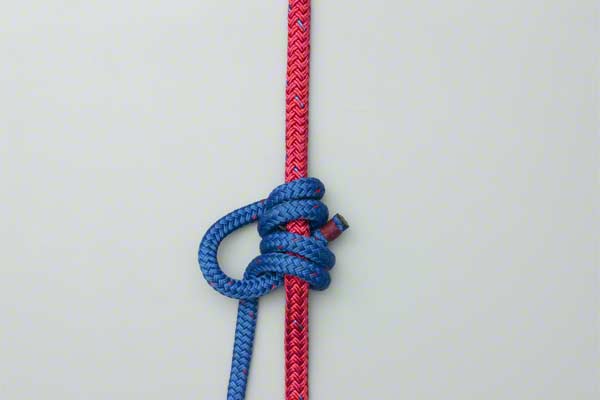
Form a loop in the working end of the rope. Place it over the post. Form a second loop identical to the first. Place it over the post and tighten.

Clove Hitch using Half Hitches Details

Alternatives: In addition to tying it Using Half Hitches, the Clove Hitch can also be tied by Threading the End and by Using Stacked Loops
Caution: The Clove Hitch (ABOK # 1245, p 224) was, originally, included here with the intention of condemning it. It does have two giant faults: it slips and, paradoxically, can also bind. It should be deeply distrusted when used by itself.
Uses: As shown in this animation, the Clove Hitch can make a quick hitch. Only two Half Hitches were used. To make the hitch secure, additional Half Hitches must be added in the same manner. The Clove Hitch has various applications. For example, in the theater it is used to adjust the height of stage curtains hanging from a bar; and in boating it can be used to initially position a fender hanging from a rail. Both are described in the section about the Clove Hitch tied by Threading the End.
Dangers: As stated above, the Clove Hitch's problems are slipping and binding:
    Slipping: I watched a friend trying to dock his 53' Hatteras. Each time the bow mooring line was handed to the marina assistant, he used a clove hitch to attach the line to the dock's post. The offshore wind was blowing the stern away so my friend used his engines to swing the stern in. Each time he did so the strain was too much for the Clove Hitch, which slipped undone. This process was repeated seven times despite increasingly forceful requests that some other knot be employed to secure the line. Reviewing the events later it became apparent that the assistant was using the only knot he knew. It is not a knot to be used alone.
    Binding: Finally, if you make the knot secure by stacking on additional Half Hitches, i.e., multiple clove hitches, then you are inviting a major strain to cause the earlier turns to bind tightly and become impossible to untie. So, if on a boat you feel an urge to use a clove hitch - resist! Choose something else unless you are merely hanging a fender.
Alternatives: There are good alternatives available:
  • Mooring:
    • A Round Turn and Two Half Hitches
    • Rolling Hitch
    • Bowline
    • Cleat Hitch
  • Temporary whipping for a frayed rope end
    • Constrictor Knot
Paradox: When you tie the round turn and two Half Hitches, in the process you actually create a clove hitch round the standing end
http://www.blogger.com

Bowline Knot Tying


Bowline Knot Tying

Form a small loop leaving enough rope for the desired loop size. Pass the end of the rope through the loop as though making an overhand knot. Continue around the standing end and then back through the small loop.

Bowline Knot Details

Uses: The Bowline (ABOK # 1010, p 186) makes a reasonably secure loop in the end of a piece of rope. It has many uses, e.g., to fasten a mooring line to a ring or a post. Under load, it does not slip or bind. With no load it can be untied easily. Two bowlines can be linked together to join two ropes. Its principal shortcoming is that it cannot be tied, or untied, when there is a load on the standing end. It should therefore be avoided when, for example, a mooring line may have to be released under load.
(http://www.animatedknots.com)

Blake's Hitch


Blake's Hitch Tying

Wrap the end of the line four times around the climbing rope. Bring the end back down, around itself, and tuck it behind the climbing rope and under the first two turns so that it exits in the middle. Tighten to achieve a tight, neat, knot.

Blake's Hitch Details

Uses: Blake's Hitch is a Friction, or Slide and Grip, hitch. It is used by arborists for ascent and descent. Like other Slide and Grip Knots, the strain should only be taken on the line below the hitch. Blake's Hitch itself should not be used for traction because pulling directly on the hitch loosens it and allows descent – unexpected and uncontrolled.
Tying It: In practice it is an advantage to wind the first two turns while your thumb is inserted up alongside the climbing rope. This maintains a pathway to make it easier to thread the line. Note: This final threading must pass behind the main rope as shown.
Additional Security: For photography, the free end has been kept short. However, in practice the end should be kept long. Some writers used to suggest the addition of a stopper knot for security, e.g., a Double Overhand or a Figure 8.
Histroy: Blake's Hitch was first described by Heinz Prohaska in an Austrian Guides Periodical in 1981 and then again in the Nylon Highway #30 in May 1990. However Jason Blake described it in a letter to the Arbor Age in 1994. It is now widely known as Blake's Hitch and this name is used here.
Pros and Cons: Like the Rolling Hitch, Blake's has the advantage that it can be tied in the end of a piece of rope instead of requiring a Prusik Loop. In practice it is a stable knot which does not creep or roll along the rope.

Alpine Butterfly Loop

Alpine Butterfly Loop (Lineman's Loop) Tying

Wrap the rope around your hand twice. At the end of turn one, position the rope close to your fingertips. Continue around and complete turn two back near your thumb. Pick up the turn near your fingertips. Wrap it around the other two turns. Slide the knot off your hand and tighten by pulling on the loop and the ends.

Alpine Butterfly Loop (Lineman's Loop) Details

Features: What is now known as the Alpine Butterfly Loop was described twice by Ashley: Lineman's Loop (ABOK # 1053, p 191); and Harness Loop (ABOK # 532, p 87). It provides a secure loop in the middle of a piece of rope. Load can be safely applied: from the loop to either end of the rope; between the two ends with the loop hanging free; or to the loop with the load spread between the two ends.
Uses: It is useful anytime a secure loop is required in the middle of a rope. A good example is when a line of hikers wish to hook on along the length of a shared rope or as a possible option for the first part of a Trucker's Hitch.
Tying it: There are several methods for tying it. We devised the method that is used in the animation. It is an improvement on other "hand-winding" methods. It helps locate the loop: the second crossing of your hand is near your fingertips and away from the other two turns. This helps you to locate it, pick it up, and wrap it around the other two strands. Setting the knot usually requires holding the loop in your teeth and pulling both ends with your hands.
Advantages: It is more stable than either the Bowline on a Bight or the Figure 8 Loop - both of which may roll over. Even after a heavy load, the Alpine Butterfly Loop remains reasonably easy to undo. In addition, it teaches the technique for tying the Alpine Butterfly Bend. This familiarity is one of the reasons that we prefer the Alpine Butterfly Bend over the other similar bends such as the Zeppelin, the Hunter's, and the Ashley.

Alpine Butterfly Bend


Climbing Knots

Climbing Knots


Selasa, 19 Februari 2013

suku indian


Copyright © 2014 B Blog